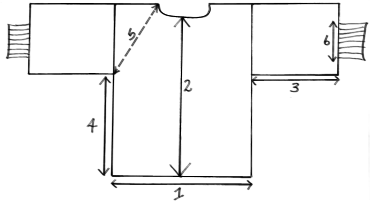
Arran Measurement System
To make sure your garment will be the best possible fit, follow our simple two-step measurement system. Our patterns are calculated for a 40 inch hip (100 cm).
The designs are planned so that you can add or subtract stitches at either side of the garment without altering the overall look of the pattern.
Step 1
Measure the body according to the following chart:

- Hip measurement, 7 inches (17.5 cm) below waist
- Back Length
- Sleeve Length (underarm to wrist)
- Underarm to Hip
- Length of Raglan (where appropriate)
- Wrist Measurement
Step 2 (inches)
see below for centimetres
Check your knitting tension.
- Cast on 20 stitches with recommended needle size and yarn
- Work 10 rows in stocking stitch (Knit 1 row, Purl 1 row)
- Measure the number of stitches per inch in the sample
- Measure round the hips 7 inches below the waist
- Divide this measurement in two for the front and back
- Example:
-
If there are 4 stitches per inch in the sample and you are 40 inches round the hips,
then calculate 20 inches for the front and 20 inches for the back.
Multiply 4 stitches × 20 = 80 stitches to cast on for the front.
Step 2 (centimetres)
see above for inches
- Cast on 20 stitches with recommended needle size and yarn
- Work 10 rows in stocking stitch (Knit 1 row, Purl 1 row)
- Measure the number of stitches across 10 cm of knitting
- Measure round the hips 17.5 cm below the waist
- Divide this measurement in two for the front and back
- Example:
-
If there are 16 stitches in 10 cm in the sample and you are 100 cm round the hips,
then calculate 50 cm for the front and 50 cm for the back.
Multiply 16 stitches × 5 = 80 stitches to cast on for the front.
![[ Banner ]](http://patterns.on-arran.com/styles/knitting/head-clare.jpg)


